Gluten Free, Lavender Cupcakes with Meyer Lemon Buttercream


Originally featured at Alisa's Garden, I thought you might like a second peek at these yummy, Spring-worthy cupcakes. The lavender is so light and fresh, and the buttercream is a perfect little spot of sweet.

Ready to make your own?


For the Cupcakes, You'll Need:
1 1/2 Cups Bob's Red Mill Gluten Free All-Purpose Flour
1 tsp. Xanthan Gum
1/2 tsp. Baking Powder
1/4 tsp. Salt
3 Tbsp. Lavender Buds
1/2 Cup Earth Balance {a dairy-free, soy-free buttery spread}
1 Cup Sugar
2 eggs {use egg replacer for vegan cupcakes}
1 Tbsp. Vanilla Extract
2/3 Cup Almond Milk

To Make:
Preheat your oven to 350 degrees and prepare a cupcake pan with 12 liners.
Combine flour, xanthan gum, baking powder, salt, and levender buds in a small bowl. Set aside.
In your stand mixer, combine Earth Balance and sugar, whisking thoroughly to combine.
While the mixer continues to run, add the eggs one at a time, followed by the vanilla.
With the mixer running at low speed, add the flour mixture 1/2 cup at a time until combined.
Stir in almond milk.
Divide the batter equally among your twelve cupcake liners, and bake, checking after 18 minutes. Cupcakes are done when a toothpick inserted near the center of a cupcake comes back clean.
After several minutes, remove the cupcakes to a wire rack to cool completely.

For the Buttercream, You'll Need:
1/2 Cup Earth Balance, at room temperature
3 Cups Powdered Sugar
2 tsp. Freshly Squeeze Meyer Lemon Juice
1 tsp. Meyer Lemon Zest
2 Tbsp. Almond Milk

To Make:
Add Earth Balance to a mixing bowl and whip thoroughly using your hand mixer.
Add powdered sugar 1/2 cup at a time, stirring on low speed to avoid a mess. Your mixture will be very thick.
Add lemon juice, zest, and almond milk, and whip for another two minutes.
If you desire a thicker frosting, add some extra powdered sugar, 1 Tbsp. at a time. If you would like to thin your frosting a bit, add some additional almond milk.


Notes:
Earth Balance becomes very soft, very quickly. If you're having trouble working with your buttercream, of if you'd like to pipe it onto your cupcakes, place it in the fridge for 15 minutes or so to cool.

If you don't have a pastry bag and would like to pipe the frosting onto your cupcakes, use a large zip-top sandwich bag. Fill the bag with frosting, then clip the bottom corner and use as you would a pastry bag.


I've shared this recipe at... Allergy Free Wednesdays

$20 DIY Photography Backdrop Stand {PVC Pipe}


I've got a newborn session coming up this weekend, and decided to finally act on the idea for a DIY backdrop stand that has been floating around in my mind. A few searches online revealed ideas similar to mine, so I decided I wasn't completely crazy and set off for the home improvement store to gather the supplies.

I knew the bill wouldn't be very big, but I was really pleased to see it come in at just under $20! Can't beat that for a sturdy, portable stand.

If you'd like to make one of your own, give these instructions a try. Please, please feel free to post your questions and I'll do my best to answer them for you. The process may look complicated, but I promise you it isn't. You'll smile at how simple it was once you're admiring your handy work.

Supplies You'll Need:
(3) 10-foot lengths of 1-inch, schedule 40 PVC pipe
(2) 90-degree, slip-in elbows {that means without threads}
(8) T-Shape slip-in connectors
(8) Slip-in end caps
A Hack saw or pipe-cutting tool {available in the plumbing section}

How to Build:
Now, this is where things get a bit more complicated! If you're like me, transporting several 10-foot lengths of pipe won't be a possibility. I've got a somewhat small SUV, and wasn't up to the challenge of tying things down with a toddler in tow. If this sounds like you, find a helpful employee at the store and kindly ask them if they'll help you make a couple of cuts so you can more easily transport your PVC.

Ask for the following cuts:
(4) Five-foot lengths {will use up two of your three 10-foot lengths of PVC}
(2) Three-foot lengths
(1) Four-foot length

This will allow you to maneuver the PVC through the store and into your car, and it'll save you a few cuts at home too!

Next, you'll need to make several more cuts at home. Work carefully and measure well to create an even, easy-to-work with backdrop stand.

The following is a complete list of cuts, with notes made if they have already been made for you by your helpful store employee:
(2) Five-foot lengths {already done!}
(2) Three-foot lengths and (2) two-foot lengths {cut these from the remaining five-foot sections}
(4) 18-inch lengths {cut from the two three-foot sections}
(8) 6-inch lengths {cut from the four-foot section}

Assembly looks like this:


...and this:


Once you've cut everything to the appropriate length, you can simply fit it together like a puzzle. I originally planned to glue some of my elbows and things in place, but after putting it together, I opted to skip the glue. This is because I have a nice, tight fit without the glue, and because I like the option to completely disassemble the pieces and create something different if I wish.

Some note-worthy thoughts and suggestions:
-Look for fittings that are not threaded. You shouldn't see threads on ANY of your connecting pieces, and if you do, you'll need to find the slip-in pieces before you can assemble your project.
-Make sure your PVC pipe is the same size as your fittings! Standing in front of that big wall of fittings and connectors, it's easy to grab from the wrong box. Double check each piece before you pay.
-Buy some heavy-duty clamps while you're at the hardware store, as pictured below. They're very sturdy, and will hold your blankets, material, etc. in place.


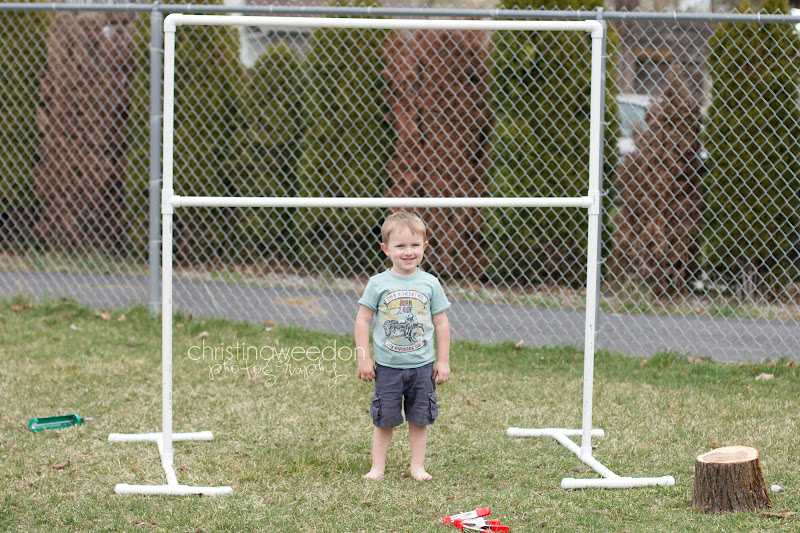
The last step? Ask your super-cute model to stand in front of your backdrop stand and take it for a test-drive. My model was a bit distracted, but daddy will be pleased to see his prop choice:


If you follow my tutorial, I'd love to hear about your experience!!

Our Backyard Chickens


We recently added three little chicks to our family! Much to my delight, they're quite photogenic, and don't mind posing to have their picture taken. 

From left to right, meet Gracie, Lola, and Poppy. With some love, care, and a little luck, we're hoping they'll provide our family with eggs {and a bit of entertainment!} in the months to come. The coop is being built as I write this, and their space mapped out in the back yard. 

Backyard chicken-keeping is growing in popularity by leaps and bounds, so I'm sure some of you might have a snippet or two of knowledge {or a funny story?} to share with me. I'd love to hear about your experience with chicken keeping!

Sparkling Lavender Lemon Tea

Good morning friends! I'm excited to bring you a guest post today from Alisa, of Alisa's Garden. Alisa's creative spirit is such an inspiration to me, so it's a treat to be able to share one of her yummy recipes with you.

The beautiful images in this post were provided by Mary Banducci Photography for Alisa's Garden. 


Alisa Writes...

Hello Dandelion readers! My name is Alisa and I am guest posting here today. I shared Christina's Lavender Lemon Cupcakes on my blog on Monday. You can see the post here. I thought I would compliment her recipe with a sparkling beverage. I chose to make sparkling lavender lemon tea. It's slightly herbal, refreshing, and relaxing with the mix of bright lemon and aromatic lavender. These two recipes would be the perfect combination for a tea party, baby shower, or bridal shower....or even a Mother's Day brunch!


Ingredients

4 lemons
1 TBS Lavender Buds (dried or fresh)
1/2 cup Agave Nectar
1 cup of Steeped Lemon Balm Tea Leaves (dried lemon balm) *optional, green tea would be a great substitute
5-6 cups Sparkling Water or Pellegrino
1 drop of Lavender Essential Oil *optional, this creates a much stronger lavender flavor


Directions

Heat 1 cup of water to brew the lemon balm leaves or green tea.

Zest the lemons then juice them.

In a medium sauce pan heat the lemon juice, zest, crushed lavender buds, and agave over low heat to bring out the lemon & lavender essential oils. Once it starts to simmer remove it from the heat and let it cool.

In a large pitcher or pretty bottles, mix the lemon lavender mixture with the sparkling water and the tea. 

Serve in a tall glass with a sprig of lavender as a stir stick and a slice of lemon. Enjoy!


Thank you, Alisa, for the delicious recipe! Thanks also for the stunning photography, Mary!

...and pssst! if you're planning an event, might I suggest Alisa's vintage rental company, The Attic??